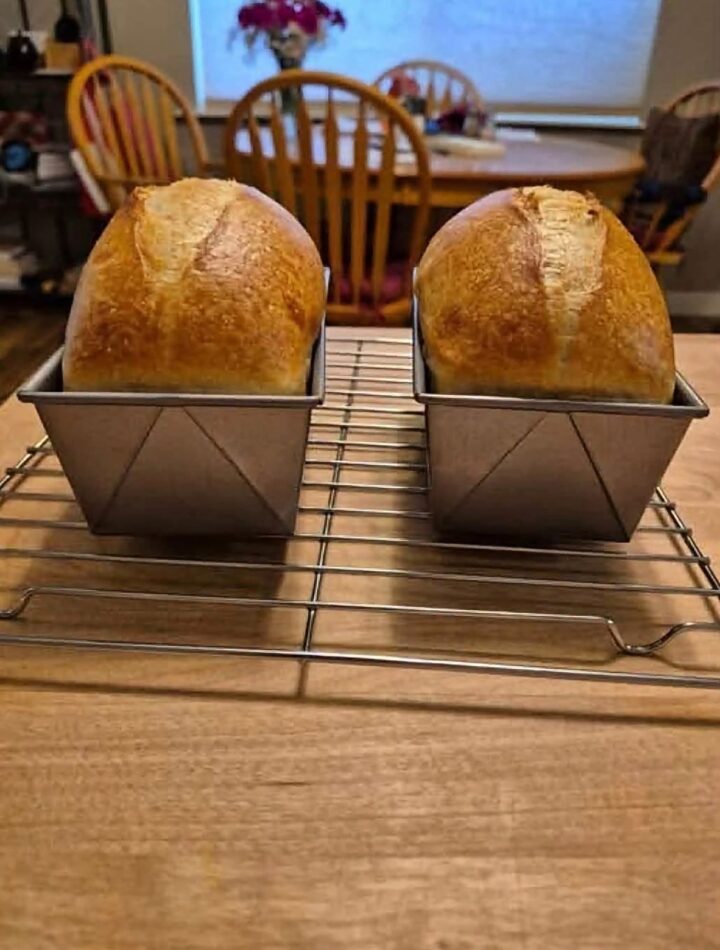
Homemade Sourdough Sandwich Bread is the perfect combination of a golden crust, soft interior, and delicious homemade flavor. Made with an active sourdough starter, bread flour, milk, butter, and a touch of honey or sugar, these loaves are tender, flavorful, and ideal for almost any meal. Whether you’re preparing sandwiches for lunch, making golden French toast for breakfast, or enjoying a warm slice with butter, this bread is sure to become a favorite in your kitchen.
The best part is that this recipe makes two beautiful sandwich loaves without requiring complicated techniques or constant stretching and folding. With a little patience during fermentation and a few simple ingredients, you can enjoy fresh homemade bread that tastes better than many store-bought options.
Why You’ll Love This Homemade Sourdough Bread
This sourdough sandwich bread has everything you want in an everyday loaf. The milk and butter help create a soft, tender crumb, while the sourdough starter adds a wonderful depth of flavor. A little honey or sugar balances the natural tanginess and helps the crust develop a beautiful golden color.
It’s also a versatile recipe. Use it for classic sandwiches, grilled cheese, breakfast toast, French toast, or simple snacks with your favorite spread. Since the recipe makes two loaves, you can enjoy one fresh and freeze the other for later.
You don’t need professional baking equipment, either. Two loaf pans, a mixing bowl, and a little time are all you need.
Ingredients You’ll Need
This recipe makes two sandwich loaves.
- 200 g active sourdough starter: Provides natural fermentation and flavor. Use a bubbly starter that has risen well after feeding.
- 700 g bread flour: Creates structure and helps the loaves hold their shape.
- 350 g warm water: Hydrates the flour and brings the dough together.
- 150 g whole milk: Adds richness and contributes to a softer texture.
- 40 g honey or granulated sugar: Adds a touch of sweetness and supports browning.
- 40 g unsalted butter, softened: Helps produce a tender, flavorful crumb.
- 12 g salt: Enhances flavor and helps regulate fermentation.
- 1 tablespoon olive oil or vegetable oil, optional: Can be used to lightly grease the bowl or add a little extra richness.
Before beginning, make sure your starter is active and bubbly. A healthy starter should smell pleasantly tangy and show plenty of activity after feeding.
How to Make Homemade Sourdough Sandwich Bread
Step 1: Mix the Wet Ingredients
In a large mixing bowl, combine the active sourdough starter, warm water, and whole milk. Stir until the starter is mostly dissolved. Add the honey or sugar and mix until incorporated.
Gradually add the bread flour, stirring with a sturdy spoon or spatula until no dry flour remains. The dough will look rough and feel slightly sticky, which is normal.
Cover the bowl and let the dough rest for 20–30 minutes. This short resting period allows the flour to absorb the liquid and makes the dough easier to work with.
Step 2: Add the Butter and Salt
Add the salt and softened butter to the rested dough. Use your hands to work the ingredients into the mixture. The dough may initially feel slippery, but continue mixing until the butter is evenly incorporated.
Knead gently for several minutes until the dough begins to feel smoother and more elastic. It doesn’t need to be perfectly smooth immediately, but it should gradually develop enough strength to hold its shape.
Avoid adding too much extra flour. A slightly tacky dough helps produce a softer sandwich loaf.
Step 3: Let the Dough Rise
Transfer the dough to a lightly greased bowl and cover it with a lid, plastic wrap, or a clean kitchen towel.
Let it ferment at room temperature for approximately 4–8 hours, depending on your kitchen temperature and starter strength. During this time, the dough should become puffier, lighter, and noticeably larger.
Rather than relying entirely on the clock, watch the dough for signs of fermentation. Look for a softer appearance, small bubbles around the edges, and an increase in volume. The dough does not always need to double completely.
Step 4: Shape the Loaves
Once the first rise is complete, transfer the dough to a lightly floured work surface. Divide it into two equal portions.
Take one portion and gently flatten it into a rectangle. Fold the sides toward the center, then roll it up into a snug loaf shape. Pinch the seam closed and place the loaf seam-side down.
Repeat with the remaining dough. Handle the dough gently to preserve some of the air developed during fermentation.
Step 5: Prepare the Loaf Pans
Grease two standard loaf pans with butter or oil. Place one shaped loaf into each pan, keeping the seam underneath.
Cover the pans loosely and leave them at room temperature for the second rise. The dough should have enough room to expand without being pressed against the cover.
Step 6: Complete the Second Rise
Allow the shaped loaves to rise for approximately 2–5 hours, depending on the temperature and activity of your starter.
The dough should look light and puffy and rise to around the rim of the pans or slightly above it. If gently pressed with a fingertip, the indentation should slowly begin to spring back.
Avoid baking too early, as under-proofed dough may produce dense bread. However, allowing the loaves to rise too long can weaken their structure and cause them to collapse.
Step 7: Bake Until Golden
Preheat your oven to 375°F (190°C).
If desired, lightly brush the tops of the loaves with milk or melted butter for a more polished finish. Place the pans on the center rack and bake for 35–45 minutes, until the tops are deeply golden brown.
If the bread begins browning too quickly, loosely cover the pans with aluminum foil for the remainder of the baking time. For the most reliable result, check the center of a loaf with a food thermometer. An internal temperature of approximately 190–200°F (88–93°C) is a useful doneness guide.
Step 8: Cool Before Slicing
Remove the pans from the oven and let the bread rest for about 10 minutes. Carefully turn out the loaves and transfer them to a wire rack.
Allow the bread to cool completely before slicing. Although warm homemade bread smells irresistible, cutting it too soon can make the inside gummy because the crumb is still setting.
Once cooled, slice with a sharp serrated bread knife and enjoy!
Tips for the Best Sourdough Sandwich Bread
Use a healthy starter. An active, recently fed starter generally gives you more predictable fermentation and better rise.
Watch the dough, not just the clock. Room temperature, starter activity, and flour can all affect rising times.
Keep the dough soft. Adding too much flour can make the finished bread dry or dense.
Don’t rush the second rise. Proper proofing helps create a light, tender loaf with an even crumb.
Brush with butter after baking. For a softer crust and a little extra flavor, brush the tops with melted butter as soon as the bread comes out of the oven.
How to Store Homemade Sourdough Sandwich Bread
Once completely cooled, store the loaves in an airtight container or bread bag at room temperature for approximately 3–4 days. Keep the bread away from excessive heat and moisture to maintain its quality.
For longer storage, slice the bread and place it in a freezer-safe bag. Freeze for up to about three months for best quality, removing individual slices whenever needed. Frozen slices can go directly into the toaster.
You can also freeze a whole cooled loaf and thaw it at room temperature before serving.
What to Serve With Sourdough Sandwich Bread
This homemade loaf is delicious in countless ways. Toast a slice and spread it with butter, jam, or honey for a simple breakfast. Use it to prepare hearty sandwiches filled with eggs, cheese, vegetables, or your favorite meats.
It also makes excellent grilled cheese, crispy French toast, and buttery breakfast toast. Even a plain slice can be satisfying when served warm alongside soup or a comforting homemade meal.
Final Thoughts
Homemade Sourdough Sandwich Bread is a wonderful recipe to keep in your regular baking routine. Its soft crumb, rich buttery flavor, and golden crust make it suitable for everyday meals, while the natural fermentation adds a distinctive homemade character.
With two loaves from one batch, you’ll have plenty for sandwiches, toast, and snacks throughout the week. Follow the fermentation cues, give the dough enough time to rise, and let the bread cool before slicing.
Once you experience the taste and texture of freshly baked sourdough sandwich bread, you may find yourself making it again and again. It’s simple, versatile, and a delicious way to bring the comfort of homemade baking to your table.